
Tutorial on How to Setup a Bitmain Crypto Miner
If you are reading this tutorial it’s safe to assume you either recently purchased a Bitmain miner or are considering the purchase of a crypto miner. Congratulations on this exciting step in your crypto journey! If you are still looking for a miner, I encourage you to shop our selection of miners. We offer some of the best prices in the industry.
This tutorial will cover Bitmain machines, however it still applies to other brands such as Cannon, Whatsminer and others (with slight variations).
Step 1: Prepare to Run Your Crypto Miner
Before you can turn on your Bitmain S19, L7 or other versions you must complete a few steps in order to properly mine cryptocurrency.
Setup a Mining Pool
Mining pools bring together individual miners who work as a single entity on a blockchain network.
Below is a list of popular mining pools. We encourage you to do your own research when selecting the best pool for you.
- F2Pool (OUR PICK)
- Slush Pool
- Antpool
- BTC.com
- Poolin
Setup a Crypto Wallet
Setting up crypto wallet is an important step when starting your miner journey. There are many options on doing this that will be out of the scope of this tutorial, but here are a few options to help get your started:
- Exchange – there are many popular exchanges that can be used including Coinbase, Crypto.com, Kucoin, Binance.us, among others.
- Software Wallet – there are many browser/app based wallets available. Some popular options are ZenGo, Ledger Live, and SafePal.
- Hardware Wallet – these are referred to as cold wallets. Ledger Nano and Trezor are a couple popular hardware wallets.
No matter which option you select it’s imperative that you select a wallet that supports the crypto you will be mining. There are many wallets specific to just BTC, ETH, LTC, DOGE, etc. Each type of wallet will clearly display which cryptocurrencies they support.
Step 2: Connect your mining pool to your wallet
For the sake of this tutorial, we are going to utilize F2Pool as our mining pool, and Coinbase as the place in which our crypto will be sent. Each mining pool and wallet will be setup a little different, but the concepts are all very similar. All of the pools/wallets will have documentation if there are any issues.
1. Obtain your wallet address
- In Coinbase, select the “Send & Receive” button at the top of the homepage.
- Select the “receive” tab.
- Select the appropriate crypto you want to send to your wallet (BTC, ETH, etc).
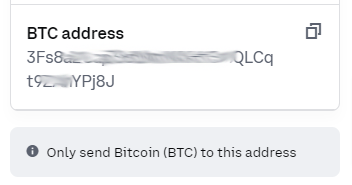
- Copy the entire crypto address (see image – the wallet address will be a long series of numbers and digits).
NOTE: It’s very important to select the right crypto address. BTC, ETH, LTC, etc all have their own unique addresses. Sending BTC to a ETH address, or ETH to a BTC address, or BTC to a DOGE address, etc, etc will result in the loss of crypto.
2. Add your wallet address into the mining pool
The next step is to input your wallet address into your mining pool. This example will use F2Pool, but each pool is very similar.
- In F2Pool, click into your account settings area. On a browser, it’s located at top right of screen.
- Click into your mining account this will be inputted into. Note: In most instances, on account settings page this will just be one account, but it is possible to break out into multiple accounts.
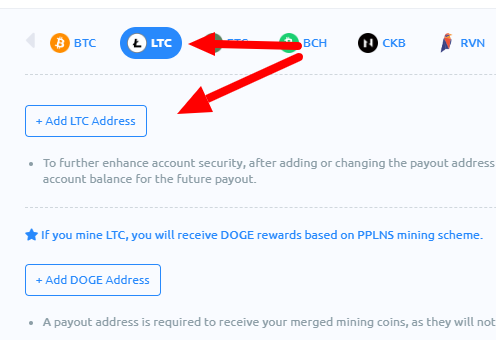
- Select which crypto you are inputting (BTC, LTC, etc).
- Then click the “Add Address” (see image).
- Paste the crypto address you copied from your wallet into the address field. Ensure that it matches to your wallet.
- Fill in any remaining fields. Click “OK”.
- NOTE: In instances in which a miner can/will mine multiple cryptos (ie: Antminer L7), you must insert multiple crypto addresses. (see image for example)
Thats it! Your mining pool is now synced up to your crypto wallet.
Step 3: Connect your miner
Now that you have your mining pool and crypto wallet information all setup, you are ready to hook your miner up! Follow the next steps to finish connecting your miner.
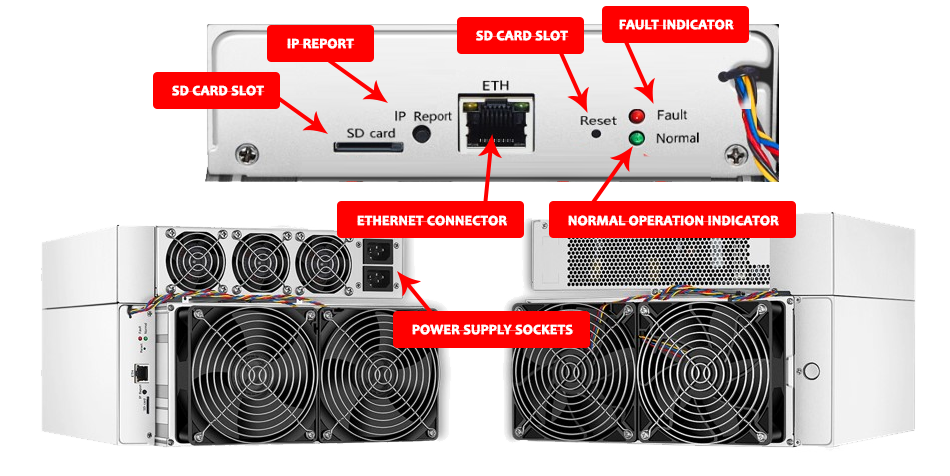
The graphic shown below is of an Bitmain Antminer s19. Most miners look very similar to this regardless of the brand. They all have an Ethernet connector, reset button and indicator lights.
1. Unpack miner and check for damage
Prior to hooking up, please unbox and inspect your miner for any damage. Check the case, fans and listen for anything jiggling around which could be internal damage. If you encounter any issues contact customer support.
Note: In our experience, if there is any issues in shipping, the fans tend to be the main issue. Check to make sure the metal guards are not pushed into the fan.
2. Plugin miner
If everything looks good, plug an ethernet cord into the “Ethernet Connector” slot. Then plug the “Power Supply Sockets” into the appropriate electrical connections (power cords are not supplied with miner).
Note: Most crypto mining machines require 220V connections. Please refer your miners instructions manual if you have any electrical concerns. If any questions or concerns please consult an electrician.
3. Find Miner IP
Once the miner is plugged in, use an IP finder tool to find the IP of your miner. There are a couple different ways to achieve this:
- If using a Bitmain machine, you can go to their IP Reporter Tool page and follow the steps using their own in-house IP finder.
- Another options is to use a 3rd party IP finder tool such as Angry IP Scanner.
The IP of the miner will be a numerical value with periods in the formatting (example: 192.168.0.1).
4. Login to the miner
- Open a browser window and enter the IP address in the address bar and hit enter.
- A prompt to login to the miner will appear. By default most miners start with the username AND password both being the word “root”. Refer to the user manual if that login information is not working. Enter that information and select sign-in.
- Once logged in, you need to enter your pool information. Select the settings tab (see image below).
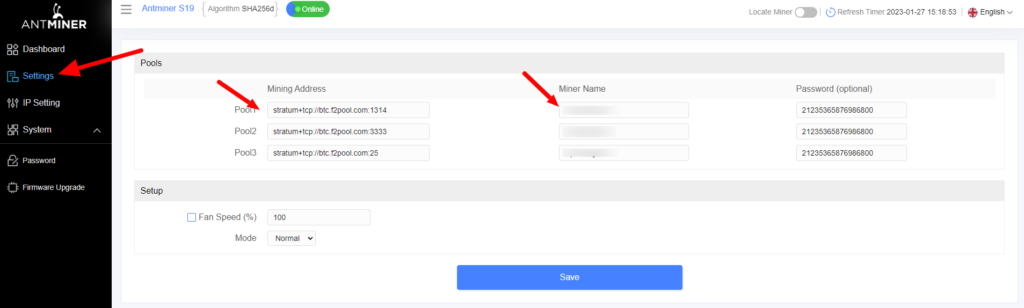
- Key in the mining pool addresses. These addresses can be located at your mining pool website. Please note, each crypto type has their own mining pool addresses, but the addresses themselves are the same for everyone. BTC has their own urls, LTC has their own, and so on. Ensure that you use the correct pool address based on the crypto type.
As an example, the following addresses are F2Pool BTC mining addresses:- F2Pool BTC Pool 1: stratum+tcp://btc.f2pool.com:1314
- F2Pool BTC Pool 2: stratum+tcp://btc.f2pool.com:3333
- F2Pool BTC Pool 3: stratum+tcp://btc.f2pool.com:25
- Key in the Miner name into all 3 fields designated for that. This is your account name that you setup when creating your pool account. Refer to your pool for that information.
As an example, if your account name was “MyAccountName” and you wanted to call your miner “MyFirstMiner” – you would enter “MyAccountName.MyFirstMiner” in each of the Miner Name fields. Then, within your mining pool that specific miner would show up in the mining pool account as “MyFirstMiner”. - Once the information is added, click SAVE. Your miner should be ready to start mining.
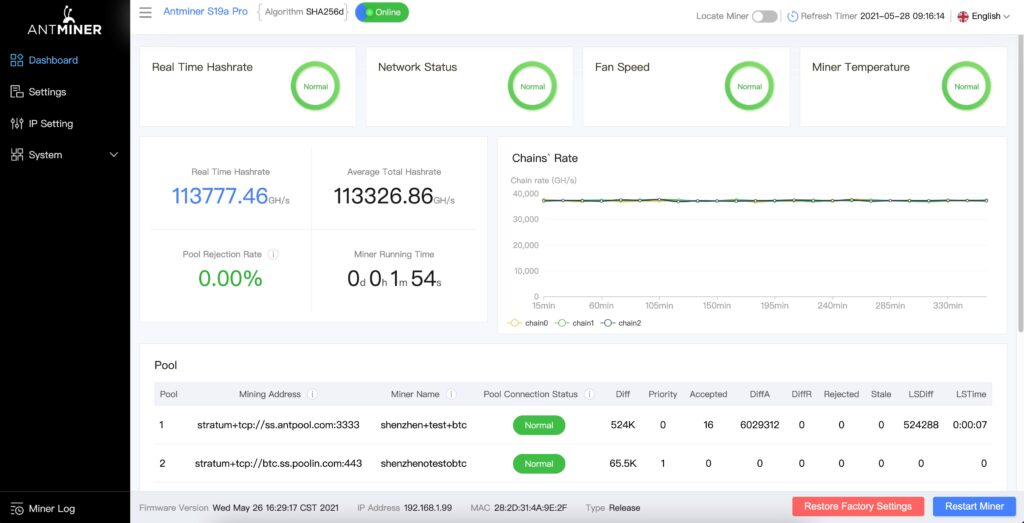
5. Verify the Miner is Hashing
After following the steps above, click the dashboard tab and let your miner reboot for a few minutes.
Once it begins hashing it should show a screen similar to the image shown. If there is any issues, such as no hashrate, network issue, bad fan or high miner temperature your miner will display that information on this page.
If everything on this page appears to be working great, jump over to your mining pool and verify your account is showing a hashrate from the miner.
Pending you followed the steps, you should be successfully mining. Good luck on your mining journey!
Shop
[et_pb_shop type=”best_selling” posts_number=”4″ _builder_version=”4.19.4″ _module_preset=”default” global_colors_info=”{}”][/et_pb_shop]
Contact Us: team@bigtopmining.com or 605-929-6620 (call or text)